
Right then, let’s chat about your loft. You’ve probably heard that loft insulation is brilliant for keeping your home cosy and saving a few quid on the heating bills. And it is! But, there’s a bit of a twist. Sometimes, all that lovely insulation can mess with the moisture levels up there, leading to damp issues. It’s all about getting the balance right between keeping the warmth in and letting the air move freely. We’ll look at how insulation affects your loft’s climate and why a bit of airflow is just as important.
Key Takeaways
- Insulation traps heat below, making your loft colder, which can cause moisture from your home to condense on cold surfaces.
- Lifestyle choices, like long showers or drying clothes inside, add moisture that can contribute to loft damp if not managed.
- Always ensure vents, especially at the eaves, are not blocked by insulation or stored items to allow air to circulate.
- Choosing the right insulation and fitting it properly, without crushing it or leaving gaps, is vital to avoid creating damp spots.
- Good loft ventilation, using roof and soffit vents, works hand-in-hand with insulation to keep your loft dry and healthy.
Understanding The Insulation-Damp Connection
Right then, let’s get stuck into how loft insulation, something we all think is just a good thing, can actually end up causing damp. It sounds a bit mad, doesn’t it? You’re trying to save energy and make your home cosy, and instead, you’re inviting mould and moisture. But it’s all down to a bit of science, really.
How Insulation Alters Your Loft’s Microclimate
When you slap insulation into your loft, you’re essentially creating a barrier. This barrier is brilliant at stopping heat from escaping your living space, which is exactly what you want. However, this also means your loft itself becomes a much colder place, especially during the winter months. Think of it like putting on a thick jumper – you stay warm, but the air around you might not.
The Role of Household Humidity
We all produce moisture in our homes without even thinking about it. Cooking, showering, even just breathing releases water vapour into the air. Normally, this moisture would find its way out of the house, perhaps through natural ventilation. But when your loft is well-insulated, that warm, moist air that rises upwards hits a much colder environment. This temperature difference is the main culprit.
Why Condensation Forms on Cold Surfaces
When warm, moist air meets a cold surface, it cools down rapidly. As it cools, it can no longer hold as much water vapour, so the excess moisture turns into liquid water. This is condensation. In a cold loft, this can happen on all sorts of surfaces – the timber beams, the roof felt, and even the insulation itself. Over time, these little droplets can add up, creating the damp conditions that lead to mould and rot. It’s a bit like seeing your breath on a cold day, but on a much larger scale and with more serious consequences for your home. If you’re looking to get a handle on moisture issues, looking into professional condensation prevention solutions might be a good idea.
Here’s a quick rundown of what happens:
- Warm, moist air rises from your living space.
- It enters the cooler loft environment.
- The air cools on contact with cold surfaces.
- Water vapour condenses into liquid droplets.
It’s not the insulation itself that’s the problem, but rather how it changes the way heat and moisture behave in your loft space. Without proper ventilation to deal with this increased moisture, you’re setting yourself up for trouble.
It’s a bit of a balancing act, really. You want the insulation for warmth and energy savings, but you absolutely need to manage the moisture that comes with it. We’ll get onto how to do that in the next sections.
Key Factors Influencing Loft Moisture Levels
Impact of Lifestyle and Daily Habits
Right, so we’ve insulated the loft to keep the house toasty, but what about what we actually do downstairs? It turns out our everyday lives can chuck a surprising amount of moisture up into the roof space. Think about it: every shower you take, every pot of pasta you boil, even just breathing – it all adds water vapour to the air. If that warm, damp air can’t escape your home properly, it’ll find its way up. And when it hits the colder surfaces in your loft, that’s when condensation starts to form. It’s a bit like breathing on a cold window. Things like drying clothes indoors or using an unvented tumble dryer are big culprits, pumping extra humidity into your home.
- Showers and Baths: Especially if you leave the bathroom door open.
- Cooking: Boiling water releases steam.
- Drying Clothes: Indoor drying racks are a major source of moisture.
- Breathing: Yep, we all contribute!
It’s easy to forget that our homes are living, breathing spaces, and with that comes moisture. The trick is managing it so it doesn’t end up causing problems in the loft.
Seasonal Weather Variations
Our British weather, bless its unpredictable heart, plays a massive role too. When it’s cold and damp outside, especially in autumn and winter, the air holds more moisture. If there’s a sudden cold snap, this can force moisture out of the air and onto cold surfaces in the loft. Wind and rain can also affect how well air can move around your loft; sometimes they can even block up vents if you’re not careful. So, while your insulation is working hard to keep heat in, the weather outside is constantly trying to push moisture in, and the airflow in your loft needs to be able to cope with both.
| Season | Typical Moisture Impact |
|---|---|
| Autumn | Increased ambient humidity, more rainfall |
| Winter | Cold snaps cause rapid condensation, high indoor humidity |
| Spring | Variable temperatures, potential for lingering dampness |
| Summer | Generally drier, but heat can still trap moisture |
The Importance of Unobstructed Airflow
This is where things get really important, especially after you’ve had insulation put in. If the air can’t move freely around your loft, any moisture that does get up there has nowhere to go. This is why things like eaves vents and soffit vents are so vital. You absolutely must make sure these aren’t blocked by insulation, storage boxes, or anything else. If insulation is packed too tightly into the eaves, or if you’ve piled stuff up against the vents, you’re essentially trapping moisture. This creates those cold spots where condensation loves to settle and can lead to damp patches forming on timbers or even the insulation itself. It’s all about letting your loft breathe.
Choosing The Right Insulation Materials

Right then, let’s talk about picking the actual stuff to go in your loft. It’s not just about grabbing the cheapest roll you see; the material itself plays a part in how your loft behaves, especially when it comes to moisture. Think of it like choosing clothes – some keep you warm but don’t let you breathe, others are lighter but still do a job. The same applies here.
Breathability and Moisture Interaction
Some insulation materials are more ‘breathable’ than others. This means they allow water vapour to pass through them more easily. While this sounds like it might let damp into your loft, it can actually be a good thing if the rest of your loft’s ventilation is sorted. It means any moisture that does get in can also get out, rather than getting trapped. Materials like mineral wool are generally quite breathable. On the flip side, some foam-based insulation is much less breathable, acting more like a barrier. This isn’t necessarily bad, but it means you absolutely must have a good vapour barrier on the warm side (your ceiling) to stop moisture getting to it in the first place.
- Mineral Wool: Good breathability, allows vapour to pass. Can be prone to sagging if not fitted well.
- Fibreglass Batts: Similar to mineral wool, generally breathable but can be compressed easily.
- Cellulose (blown): Can be breathable, but its performance depends on how it’s installed and protected. It’s great for filling awkward spots.
- Rigid Foam Boards: Very low breathability. Needs careful sealing around edges to prevent air leaks.
The key takeaway here is that no insulation material is inherently ‘bad’ for damp. It’s all about how it interacts with the moisture already in your home and how well it’s installed. A breathable material in a poorly ventilated loft might let moisture through, but a non-breathable one with no vapour barrier can trap it even worse.
Installation Risks Associated with Materials
Even the best material can cause problems if it’s not put in correctly. This is where things can get a bit tricky. For instance, those fluffy rolls of fibreglass or mineral wool? They’re brilliant insulators, but if you squash them down, especially around eaves or light fittings, you create ‘cold bridges’ where heat can escape and condensation can form. It’s like trying to keep warm by wearing a jumper that’s too tight – it doesn’t work as well. Blown insulation, like cellulose, is good for filling gaps, but if it’s not blown in at the right density, it can settle over time, leaving thinner patches higher up. This is why getting a professional to install your loft insulation is often a good idea.
Impact of Material Density and Settling
Density is a big one, especially with blown insulation. If it’s blown too loosely, it won’t perform as well and can even allow air to move through it, which isn’t what you want. Over time, some types of insulation can settle, meaning the thickness reduces, particularly at the edges. This is why you often see recommendations for topping up insulation after a few years. You want a material that stays put and maintains its thickness. Rigid boards, while not prone to settling, can create problems if there are gaps between them or around the edges. These gaps are like tiny little highways for warm, moist air to sneak into your cold loft space and cause trouble. So, while the R-value (how well it resists heat flow) is important, how the material holds its shape and density over time is just as vital for long-term performance and preventing damp.
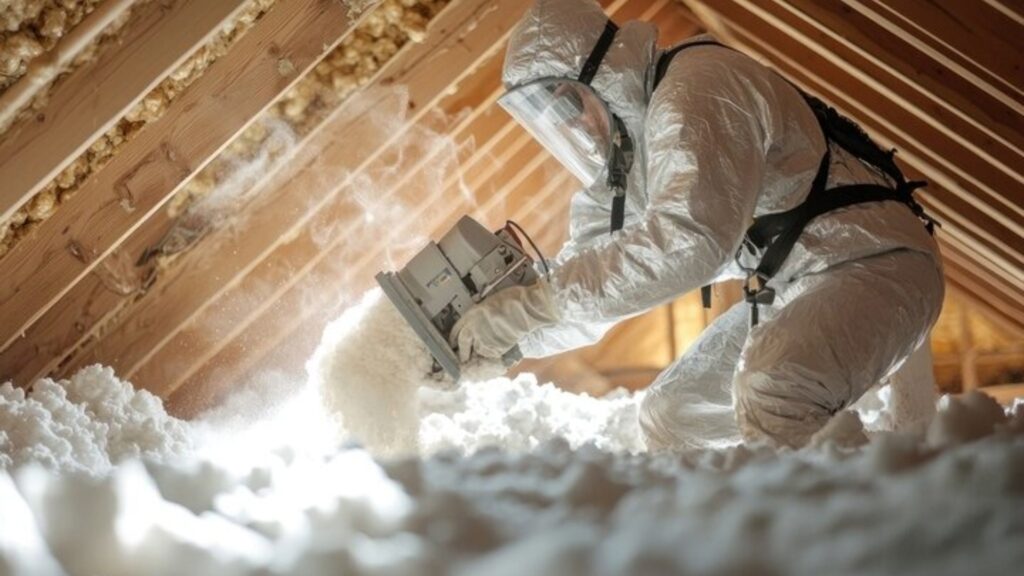
Critical Installation Practices For Loft Insulation
Right, so you’ve picked your insulation, which is great. But honestly, how you actually get it into the loft is probably more important than the specific type you’ve chosen. Mess this up, and you could be inviting damp and all sorts of other headaches down the line. It’s not just about chucking rolls of the stuff up there; there’s a bit more to it than that.
Avoiding Blocked Eaves and Crushed Insulation
This is a biggie. Those little gaps at the eaves, where the roof meets the walls, are super important for letting air move around. If you pack insulation too tightly here, or shove boxes and junk right up against them, you’re basically shutting off the ventilation. Think of it like trying to breathe with your nose and mouth covered – not ideal. This trapped moisture then has nowhere to go, and that’s when condensation starts to form on the cold surfaces up there.
- Always use baffles or vents at the eaves. These are like little channels that keep the insulation from blocking the airflow. They need to maintain a gap of at least 25mm and stick up a good 50mm above the insulation level. This stops loose-fill insulation from getting sucked into the airflow and also helps stop wind-driven rain from getting in.
- Don’t just dump stuff in the loft and hope for the best. Be mindful of where you’re putting things, especially near the eaves.
- If you’ve got a lot of wiring or pipes, make sure the insulation doesn’t get squashed around them. Compressed insulation just doesn’t work as well and can create cold spots.
The Necessity of Vapour Barriers
Think of a vapour barrier as a bit like a raincoat for your insulation. Warm, moist air from your house – from cooking, showering, even just breathing – will naturally try to rise up into the cooler loft space. If this warm, moist air gets into the insulation itself, it can cool down and condense, turning into water. A vapour barrier, usually a plastic sheet or a foil-backed material, is fitted on the warm side of the insulation (that’s the side facing your living room, not the outside). Its job is to stop that moisture from getting into the insulation in the first place.
The key is to create a continuous layer. Any gaps or tears in the vapour barrier are like little holes in your raincoat – moisture will find its way through.
- Install the vapour barrier before the insulation. It needs to be on the ceiling side of the insulation, directly below the joists.
- Overlap all seams by at least 100mm and tape them securely with appropriate tape. Don’t skimp on the tape!
- Carefully seal around any penetrations, like light fittings or pipes, using sealant or tape. This is where most problems can occur if not done properly.
Ensuring Proper Fit and Avoiding Gaps
This ties into the other points, really. Gaps are the enemy of good insulation. Whether it’s around the edges, between batts, or where insulation meets walls or joists, any gap means that warm air can escape, and cold air can get in. This not only makes your insulation less effective but also creates those cold spots where condensation loves to form. It’s about making sure the insulation is a snug fit everywhere, like a well-tailored suit, not a baggy old jumper.
- Pay close attention to awkward corners and edges. These are the trickiest bits, and often where gaps appear.
- If you’re using insulation batts, try to cut them to fit snugly between the joists. Don’t just stuff them in there loosely.
- For blown insulation, make sure it’s installed to a consistent depth across the entire loft floor. Use depth markers to check this.
Getting these installation details right means your insulation will do its job properly, keeping your home warm and dry, and helping to prevent those pesky damp issues before they even start.
The Crucial Role Of Loft Ventilation
Right, so we’ve talked about insulation, but what about letting the air move around up there? It’s a bit like trying to breathe in a stuffy room – not ideal. Loft ventilation is basically about making sure your loft doesn’t become a damp, mouldy trap. Without it, all that lovely insulation you’ve put in can actually cause more problems than it solves, especially in the UK’s damp climate.
Enhancing Airflow with Roof and Soffit Vents
Think of roof and soffit vents as the lungs of your loft. Soffit vents are usually found under the eaves, letting fresh air in, while roof vents (or ridge vents along the very top of the roof) let the moist air out. Getting these working properly is key to preventing condensation. If they’re blocked by insulation, debris, or even just painted over, the air can’t circulate. This means any moisture that gets up there – and believe me, it does, from cooking, showering, even just breathing – just hangs around, chilling on the cold roof timbers and insulation, and turning into water droplets. It’s a bit like leaving a cold drink out on a humid day; you get that sticky film of water. For a healthy roof space, you need a constant, gentle flow of air.
Maintaining Clear Ventilation Pathways
This is where things can go a bit pear-shaped if you’re not careful, especially after insulation has been installed. It’s really important that nothing is blocking those vents. Sometimes, people accidentally push insulation right up against the soffit vents, or stored items in the loft can end up smothering them. You need to make sure there’s a clear channel for air to get in and out. A simple way to check this is to go up into your loft and have a look. Can you see daylight through the soffit vents? Is there a clear gap above any insulation near the eaves?
- Check soffit vents: Ensure they aren’t covered by insulation or stored items.
- Inspect roof vents: Make sure they’re not blocked by debris or paint.
- Create air channels: If needed, use baffles or spacers to keep insulation away from vents.
If you’ve had insulation put in recently, it’s worth double-checking that the installers left adequate space around the ventilation points. Sometimes, in the rush to get the job done, these details can be overlooked, leading to problems down the line.
Balancing Ventilation with Insulation
This is the tricky bit, the whole point of this article really. You want your loft to be warm and cosy, so you insulate it. But you also need it to breathe, so you ventilate it. It sounds like a contradiction, doesn’t it? The trick is to get the balance right. You need enough insulation to keep the heat in your living space, but not so much that it traps moisture in the loft. And you need enough ventilation to let that moisture escape, but not so much that you’re losing all your heat. It’s about creating a healthy microclimate up there. For example, in winter, warm, moist air from your home rises. If it hits cold surfaces in a poorly ventilated loft, it condenses. Good ventilation removes that moist air before it can cause trouble. It’s a bit like managing your home’s energy – you want efficiency without sacrificing comfort or creating new problems.
Here’s a quick rundown of what happens when the balance is off:
| Problem Area | Consequence |
|---|---|
| Too much insulation | Traps moisture, leading to damp and mould. |
| Too little insulation | Heat loss, higher energy bills. |
| Poor ventilation | Condensation, mould, timber rot. |
| Too much ventilation | Unnecessary heat loss, colder living space. |
Detecting And Preventing Damp Issues
Right then, let’s talk about spotting damp before it turns into a proper headache. It’s all about being a bit observant, really. You can’t always see damp creeping in, but there are definitely signs if you know where to look. Think of it like this: catching a small problem early means you avoid a massive, expensive mess down the line.
Early Warning Signs of Moisture Problems
So, what should you be keeping an eye out for? Little things can add up. You might notice a faint, persistent smell – a bit musty or earthy, not just a fleeting whiff. Sometimes, you’ll see tiny droplets or a bit of a sheen on the roof timbers or the felt lining. Look out for flaky paint, especially where timbers meet or along roof junctions. Salt streaks, called efflorescence, can appear on brickwork, and the insulation itself might feel a bit clammy to the touch. These aren’t things to ignore; they’re your loft’s way of telling you something’s not quite right.
Minimising Indoor Moisture Sources
Now, a lot of damp starts inside the house, believe it or not. Simple things like showering with the bathroom door open, drying clothes indoors without good ventilation, or even just blocking up those vital loft vents with stuff you’ve stored can make a big difference. If you’re blasting the heating on and then off again, your loft can get cold enough for condensation to form. It’s a bit of a balancing act, and these daily habits really do contribute to the moisture levels up there.
When To Seek Professional Assessment
Honestly, if you’re seeing persistent stains, timbers that feel soft or spongy, or you’re constantly battling musty smells, it’s probably time to call in the cavalry. While you can do a lot of the basic checks yourself, sometimes you need the proper gear. Tools like hygrometers can tell you about humidity levels before you see anything, moisture meters give precise readings on wood and insulation, and thermal cameras can spot cold spots you’d never see otherwise. If you’re unsure about what you’re seeing, or if the problem seems to be getting worse, getting a professional survey is the best way to get peace of mind and a clear plan of action. They can pinpoint the exact cause and sort it out properly.
Dealing with damp can be a real headache, but don’t let it ruin your home. We’ve got the know-how to spot and stop damp problems before they get out of hand. Want to keep your place dry and cosy? Visit our website to learn more about how we can help you tackle damp issues effectively.
So, What’s the Takeaway?
Right then, we’ve gone through why shoving loads of insulation into your loft without a second thought can actually cause more problems than it solves, especially when it comes to damp. It’s not about ditching insulation altogether, far from it! It’s just about being smart. Think of it like this: insulation keeps the warmth in your house, which is brilliant for your bills, but it makes your loft colder. That cold loft then becomes a magnet for all the moisture we create just by living – cooking, showering, even breathing. So, the trick is to make sure that moisture has somewhere to go. Proper ventilation, like making sure your eaves aren’t blocked and air can actually get in and out, is just as important as the insulation itself. Get that balance right, and you’ll have a cosy, energy-efficient home that’s also nice and dry. Don’t just slap insulation in and hope for the best; give your loft a bit of airflow love too!
Frequently Asked Questions
So, how does loft insulation actually cause damp?
It’s not the insulation itself that’s the bad guy! When you add insulation, your loft gets colder because the warmth stays downstairs. Any steamy air that drifts up from your kitchen or bathroom will then cool down really fast when it hits these cold surfaces in the loft. This makes the moisture in the air turn into water droplets, which is basically condensation. If this happens a lot, it can lead to damp patches and even mould.
What’s the deal with condensation forming on cold surfaces?
Think about a cold glass of water on a warm day. You see water droplets form on the outside, right? It’s the same idea in your loft. When warm, moist air from your home meets a cold surface – like the timbers or even the insulation – the air can’t hold all that moisture anymore. It has to let it go, and that moisture turns into liquid water, causing condensation.
How can everyday things I do at home make my loft damp?
Loads of things! Having long, steamy showers with the bathroom door open, drying your clothes inside on radiators, or even just cooking without a lid on your pans all add extra moisture to the air in your home. If this moist air makes its way up to your loft, it’s got nowhere to go if the ventilation isn’t good, and it can all build up.
What’s the best way to make sure my loft is ventilated properly?
You need to let that moist air escape! The best way is to make sure you have vents, often called soffit vents (under the eaves) and roof vents. It’s super important that these aren’t blocked up by insulation, rubbish, or anything else. Keeping these pathways clear lets fresh air circulate and pushes out the damp air.
Are some insulation materials better than others for stopping damp?
While some materials might handle moisture a bit differently, the way they’re put in is way more important. If insulation is squashed, leaves gaps, or blocks vents, it doesn’t matter what type it is – it can still cause problems. Making sure there are no gaps and that airflow isn’t blocked is key, no matter what material you choose.
How can I spot damp in my loft before it becomes a big problem?
Keep an eye out for little signs. You might notice a faint musty smell, especially when you open the loft hatch. Sometimes you’ll see tiny water droplets on the timbers or insulation, particularly on colder mornings. If you see any dark spots, mould, or feel any dampness, it’s time to investigate further or get some expert advice.